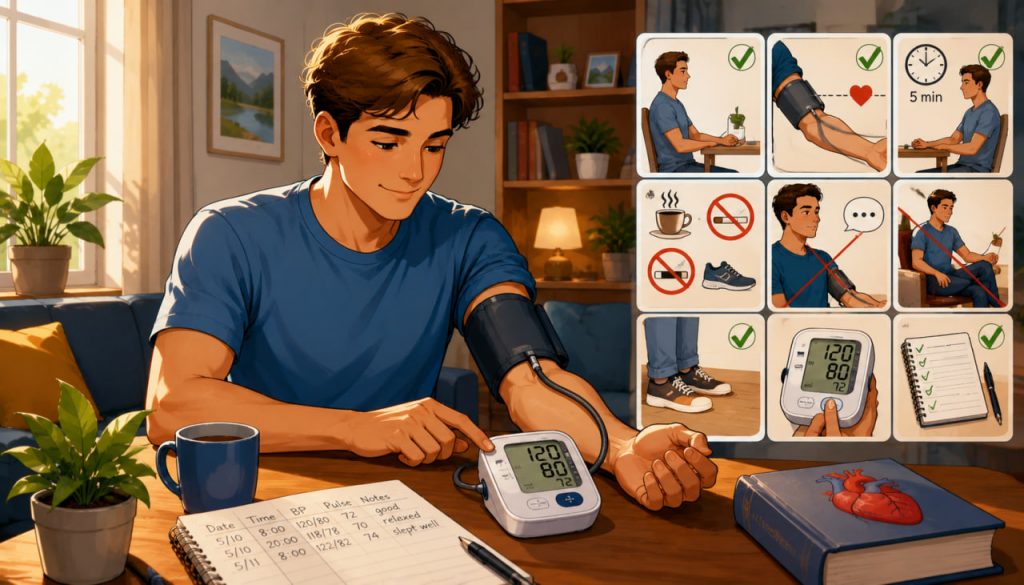
Measuring blood pressure at home may seem simple: put on the cuff, press a button, and read the numbers. In practice, small mistakes can significantly affect the result.
Talking, crossing your legs, using the wrong cuff size, placing the arm too low, or measuring immediately after exercise can produce a misleading reading. This may create unnecessary anxiety or hide a genuine health problem.
Accurate blood pressure monitoring depends on three things: a validated device, correct preparation, and consistent measurement technique.
What Do Blood Pressure Numbers Mean?
Blood pressure describes the force of blood pushing against the walls of the arteries.
The result is written as two numbers and measured in millimetres of mercury, abbreviated mm Hg.
The upper number is the systolic pressure. It represents pressure in the arteries when the heart contracts and pumps blood.
The lower number is the diastolic pressure. It represents pressure while the heart relaxes between beats.
For example, a reading of 120/80 mm Hg means a systolic pressure of 120 and a diastolic pressure of 80.
A single measurement is only a snapshot. Blood pressure naturally changes throughout the day in response to movement, stress, sleep, temperature, food, medication, and other factors.
Choose the Right Blood Pressure Monitor
For most people, an automatic monitor with a cuff placed around the upper arm is the preferred option for home use.
Upper-arm devices generally provide more reliable readings than wrist monitors because wrist position is easier to get wrong. Finger monitors and unvalidated smartphone applications should not be relied upon for medical decisions.
Choose a model that has been independently validated for clinical accuracy. The ValidateBP listing, supported by the American Medical Association, includes devices reviewed against recognized validation criteria. WHO also emphasizes the importance of clinically validated automated blood pressure devices.
A device being available for sale does not automatically prove that it measures blood pressure accurately.
Ask a healthcare professional whether your monitor is appropriate, particularly during pregnancy, childhood, irregular heart rhythms, or when the upper arm is unusually large or small.
Make Sure the Cuff Fits
Cuff size is one of the most important and frequently overlooked details.
Measure the circumference of the middle of your upper arm and compare it with the range printed on the cuff or in the device instructions.
A cuff that is too small may produce an artificially high reading. A cuff that is too large may produce an inaccurate result in the opposite direction.
The cuff should wrap securely around the bare upper arm without being painfully tight. Its lower edge is usually positioned just above the bend of the elbow, following the manufacturer’s instructions.
Never place the cuff over a sleeve, even when the fabric is thin.
Prepare for the Measurement
Avoid exercise, smoking, vaping, and caffeinated drinks for at least 30 minutes before measuring. These can temporarily raise heart rate and blood pressure.
Empty your bladder first. A full bladder may also increase the reading.
Do not measure immediately after climbing stairs, rushing through the house, taking a shower, eating a heavy meal, or having an upsetting conversation.
Sit quietly for at least five minutes before starting. Do not talk, read messages, watch an exciting video, or make telephone calls during this rest period.
The American Heart Association recommends avoiding caffeine, smoking, and exercise for 30 minutes, emptying the bladder, and resting quietly for at least five minutes before measurement.
Sit in the Correct Position
Sit on a chair with your back fully supported.
Place both feet flat on the floor. Do not cross your legs, ankles, or feet.
Support the arm on a table or firm surface so that the middle of the cuff is approximately level with the heart. The muscles of the arm should remain relaxed.
Keep your hand open rather than making a fist.
The cuff must be placed directly against bare skin. Sit still and do not talk while the monitor is operating.
The CDC summarizes the correct position as: back supported, feet flat on the floor, cuff against bare skin, no talking, and the arm supported at chest or heart level.
How to Take the Reading Step by Step
Once you are rested and correctly positioned, place the cuff around the upper arm according to the device instructions.
Start the monitor and remain completely still while the cuff inflates and deflates.
Record the systolic pressure, diastolic pressure, pulse rate, date, and time.
Wait one or two minutes and repeat the measurement. The CDC recommends taking at least two readings one or two minutes apart.
When monitoring over several days, calculate or discuss the average rather than focusing on the highest isolated result.
A useful record may include:
- Date and time
- First reading
- Second reading
- Pulse
- Medication timing
- Relevant symptoms
- Unusual circumstances, such as poor sleep or stress
Do not repeatedly measure every few minutes because one result makes you nervous. Anxiety itself may keep the pressure elevated.
Which Arm Should You Use?
During an initial assessment, a healthcare professional may compare readings in both arms.
Small differences are common. After that comparison, you may be advised to use the arm that consistently gives the higher result.
When no meaningful difference has been identified, either arm may be used. The most important rule is consistency: use the same arm under similar conditions when tracking changes over time.
Do not place the cuff on an arm with a dialysis fistula. People who have undergone lymph-node surgery, breast surgery, vascular procedures, or treatment affecting an arm should ask their healthcare professional which side to use.
When Should You Measure Blood Pressure?
Follow the schedule recommended by your doctor, particularly when starting or changing medication.
A common home-monitoring plan involves readings in the morning and evening over several days. Morning measurements are often taken before breakfast and before blood-pressure medication, unless the clinician provides different instructions.
Try to measure at approximately the same times every day.
Do not compare a relaxed morning reading with one taken after exercise, work stress, coffee, or a large meal and assume that the difference represents a medical change.
Consistency makes a series of readings more useful than any single measurement.
Common Mistakes That Distort the Result
Several everyday errors can change blood pressure readings:
- Measuring over clothing
- Using an incorrectly sized cuff
- Crossing the legs
- Leaving the feet unsupported
- Holding the arm below heart level
- Talking during measurement
- Failing to rest beforehand
- Measuring immediately after caffeine or exercise
- Tensing the arm or making a fist
- Taking only one reading
- Using an unvalidated monitor
A wrist monitor may provide acceptable readings in certain circumstances, but the wrist must be positioned precisely at heart level. For routine home monitoring, an automatic upper-arm device is usually easier to use correctly.
Why Home and Clinic Readings May Differ
Some people have higher readings in a medical office because they feel nervous. This is often called the white-coat effect.
Others have acceptable readings in the clinic but higher pressure during normal daily life. This is called masked hypertension.
Home monitoring can help identify these patterns, but it should be interpreted with professional guidance. A clinician may recommend ambulatory monitoring, in which a portable device records blood pressure repeatedly over 24 hours.
Do not change, skip, or increase medication based only on a home reading unless your healthcare professional has given you a specific plan.
Expert Perspective
The American Heart Association recommends automatic upper-arm monitors, a correctly fitted cuff, quiet rest, proper body positioning, and repeated measurements. It also advises bringing the home monitor to a medical appointment so that its readings and technique can be checked.
These recommendations illustrate a central principle of hypertension care:
Measurement technique is not a minor detail. An inaccurate reading can lead to an inaccurate clinical decision.
What to Do With an Unusually High Reading
One high result does not automatically mean an emergency.
Remain seated, avoid talking, wait at least one minute, and measure again using the correct technique. Record both results.
Contact a healthcare professional if readings remain repeatedly above the range they have set for you.
If blood pressure is higher than 180/120 mm Hg, repeat the measurement after at least one minute. If it remains this high, seek urgent medical advice.
Call emergency services immediately when a reading above 180/120 mm Hg occurs with symptoms such as chest pain, shortness of breath, weakness, numbness, back pain, vision changes, or difficulty speaking.
Pregnancy requires separate guidance. A pregnant person with an elevated reading, severe headache, visual disturbance, upper abdominal pain, sudden swelling, breathing difficulty, or other concerning symptoms should seek prompt medical assessment.
Interesting Facts
- Blood pressure can change from one minute to the next.
- Talking during measurement may raise the recorded value.
- A cuff that is too small can make blood pressure appear higher than it is.
- A full bladder can temporarily affect the result.
- The arm should be supported rather than held up by muscle effort.
- Home readings can help reveal white-coat and masked hypertension.
- Automated monitors usually estimate pressure by detecting pulsations in the cuff.
- Blood pressure may differ slightly between the right and left arms.
- One isolated reading is less informative than a consistent record collected over time.
- Home monitoring complements medical care but does not replace professional diagnosis.
Glossary
- Blood Pressure — The force of circulating blood against the walls of the arteries.
- Systolic Pressure — The upper number, representing pressure when the heart contracts.
- Diastolic Pressure — The lower number, representing pressure when the heart relaxes.
- mm Hg — Millimetres of mercury, the standard unit used for blood pressure.
- Hypertension — Persistently elevated blood pressure.
- Cuff — The inflatable band placed around the arm during measurement.
- Validated Device — A monitor independently tested according to recognized accuracy standards.
- Pulse — The number of heartbeats per minute.
- White-Coat Effect — Higher blood pressure in a medical environment than outside it.
- Masked Hypertension — Normal clinic readings combined with elevated readings elsewhere.
- Ambulatory Monitoring — Repeated automatic blood-pressure measurement over a prolonged period, usually 24 hours.
- Heart Level — The approximate height of the heart at which the cuffed arm should be supported.
- Hypertensive Emergency — Severely elevated blood pressure accompanied by symptoms or signs suggesting acute organ damage.
- Clinical Accuracy — The degree to which a medical device produces results sufficiently reliable for healthcare decisions.